Taber Stiffness Tester
Taber Stiffness Tester
| Country of Origin | United States |
| MOQ | 1 Units |
| Price | USD 10052 / Units |
| Category | Machinery & Industrial Supplies Electronic Manufacturing Machinery |
Contact Taber Stiffness Tester supplier for wholesale b2b price, customization or other inquiries
Post Buy Requirement
Get quick response from worldwide suppliers
Taber Stiffness Tester
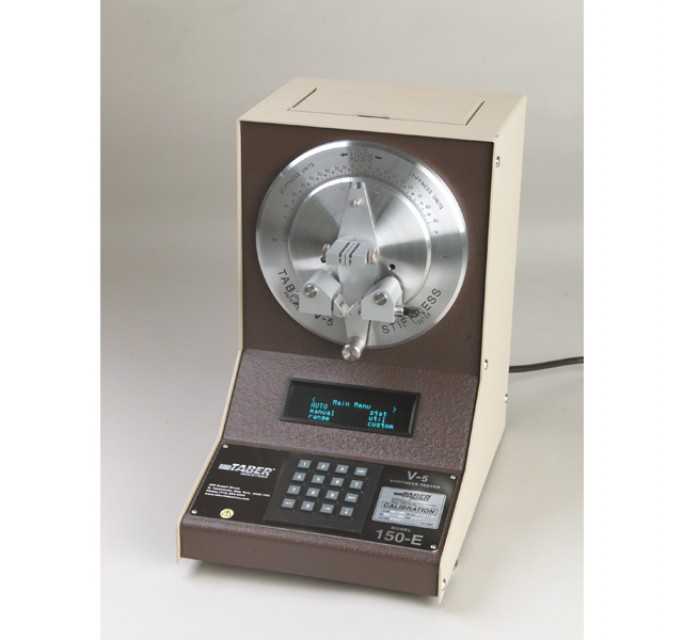
The TABER® V-5 Stiffness Tester - Model 150-B or 150-E is used to evaluate stiffness and resiliency properties of materials up to 10,000 Taber Stiffness Units. This precision instrument provides accurate test measurement to ±1.0% for specimens 0.004" to 0.219" thickness. Materials include paper products, cardboard, plastics, metals, textiles, rubber, wire, tubing, felts and other sheet materials.
Description
Incorporated in the TABER V-5 Stiffness Tester is a bi-directional pendulum weighing system. Providing an accurate and responsive method for measuring small load increments, this system is a critical component for determining material stiffness or resiliency. Nine (9) distinct ranges permit testing of materials that are extremely lightweight and flexible (such as cellophane or thin metallic foils) to items that are very rigid (such as plastics).
For test ranges 2 - 9, specimens are mounted on the Taber V-5 Stiffness Tester using a clamping system. Located on the pendulum, the lower faces of the specimen clamp jaws are exactly on the center of rotation. This ensures a constant test length and deflection angle for accurate and repeatable results. Both jaws of the specimen clamp are adjustable, so the test specimen can be positioned precisely in the center regardless of material thickness. Force is applied to the lower end of the specimen by a pair of rollers. The rollers, which are attached to a driving disc located directly behind the pendulum, push against the test specimen and deflect it from its vertical position. The pendulum applies increasing torque to the specimen as it deflects further from its original position. The test point reading occurs when the pendulum mark aligns with the appropriate driving disc mark (7 1/2° or 15°), which points to the stiffness reading on the dial point. The final reading will depend on the range in which the test is being conducted and what scaling factor to use. The instrument outputs the moment load applied to the test specimen in TABER Stiffness Units (g · cm).
Note: The right hand roller includes a ratchet stop mechanism that greatly reduces the potential for inter-operator error caused by over or under-tightening. The travel on the right hand assembly automatically stops when the roller contacts the specimen.
To allow the testing of materials with different stiffness properties, range weights can be applied to the pendulum. For extremely light weight materials, a compensator range weight is mounted to the top of the pendulum. Range weights of 500, 1000 and 2000 "Taber Units" are mounted to the bottom of the pendulum and required for stiffer materials. An optional range weight set of 3000 and 5000 Taber units is required for test ranges 7, 8 and 9.
Range 1 is used with Taber's optional Sensitivity Range Attachment (also referred to as SR or High Sensitivity Attachment) to test extremely lightweight and flexible materials whose Taber Stiffness Unit value are between 0 - 1. Examples include cellophane, natural fibres and synthetic filaments, tissue paper, metallic foils, films, etc. The attachment includes two parts, the Driven Pins Holder which is secured between the clamp jaws, and the Driving Pins Holder which is mounted to the studs in place of the left and right hand rollers. Both parts include precision pins that are oriented horizontal to the face of the V-5 Stiffness Tester. A specimen 1 1/2" x 1 1/2" is mounted such that the second and fourth pins are above the specimen. As the driving disc rotates, the fourth pin of the Driving Pins Holder pushes down on the specimen while the first pin pushes up. As the sample is deflected, the Driven Pins Holder aligns the pendulum to the appropriate stiffness value. For Range 1, the specimen is only deflected to the right.
Many customers have also utilized the Taber V-5 Stiffness Tester to evaluate wire and cable stiffness characteristics. The tester now incorporates a "v-notch" in the clamps to accommodate this testing. Suggested samples are 70mm long and 3mm - 8mm in diameter, and centered in the notch with care so as to not pinch or crimp the sample. For wire and cable samples less than 3mm diameter, it is recommended to secure the sample at a location in the flat region of the clamp. Samples with curvature may interfere with proper set-up and function of the Stiffness tester and should be avoided. In addition, test results obtained should be used for comparison only - that is, between lots, between materials, etc.
*Auxiliary Range Weight Set (range 3000 - 5000 Taber Units) is sold separately and required for ranges 7 - 9.
| Delivery Info: | 5-6 Weeks after raising the Purchase Order |
Product Specification
| Model Number : | 150-B |
Product Keywords: Testing Equipment, Measuring Equipment
Product Images
Supplier Info
| Company Name | : | |
| Business Type | : |
|
| Supplier Phone: | : | +9190044xxxxx |
Supplier Info:
Energid Instruments
 Maharashtra, India
Year Established: 2020
Business Type:
- Wholesaler
- Trading
Contact Supplier About This Product
Contact Supplier for product pricing, customization or other inquiries
Send Your Message to: Energid Instruments
Related Products
- Laser Scoring System
- Zortrax Inventure 3D Printer
- 2D Automatic CNC Video Measuring Machine
- Optical Fiber Bundle Y Shape
- EOT Overhead Crane
- YE3 Series Three-Phase Asynchronous Motor 11KW-4
- Salt Spray Tester with ASTM Salt Testing Machine
- IEC TS 62782 PV Modules Cyclic Dynamic Mechanical Load Testing Machine
- Megger MIT30
- Fluke Calibration 6531-200M-B
- LS163A tint tester
- Fibre Bundle Strength Tester


-1642414519.jpg)


